Hosted Payments
When you’re running a business where you receive payments in a manner that the physical card is not present, such as online payments and eCommerce, you need to figure out how to take payment from your customers.
We call these types of payments, Card-Not-Present.
Any CNP payment system needs to be simple (both for you to build, and for the customer to use) and secure (so there’s no danger of hacking, scamming, or the breach, and so that the customer trusts the payment method enough to use it). In addition to the secure and straightforward, your CNP payment systems must comply with PCI regulations.
Hosted Payments are the most logical and accessible method to accomplish an online payment. In this article, I have explained the difference between the two main options most businesses use:
1- HPP or Hosted Payment Page
2- HPF or Hosted Payment Form
Although, sometimes, these two terms considered to be the same, but some differences make them separate methods. At least you can see that we have a “Page” vs “Form”!
HPP – Hosted Payment Page
Hosted Payments Page (HPP) integration offers checkout/payment forms that are SAQ-A-compliant (Self-Assessment Questionnaire) and that make collecting payment information from your customer easy, and without the payment data touching your server and infrastructure.
HPP provides a template that helps you create a modern, customized, and responsive checkout page. In most cases, HPP also enables you to brand your checkout page with your business logo and color schemes.
A hosted payment page passes information from your platform(website, eCommerce) to a payment page hosted elsewhere. The third-party page handles the transaction. It’s effortless for you to use a hosted payment page.
HPP provider handles all the security and compliances for the transactions, relieving you of this responsibility and improves customer confidence.
HPP solutions require a small level of integration between your platform and the hosted payment page.
Although always recommended to secure your website with an SLL when using an HPP integration, you could skip the SLL, since the hosted solution handles the payment and personal information.
For example, most PayPal integrations fall into the HPP integration category.
Your customer clicks on a payment button, and it takes them to the PayPal website. After processing the payment, PayPal sends the customers back your website to a specific page, which you have designated in your integration code.
Your code handles the results of the processing, whether it has been approved or declined.

HPF – Hosted Payment Form
HPF method offers checkout/payment forms that are SAQ-A-compliant and that make collecting payment information from your customer easy, and without the payment data touching your server.
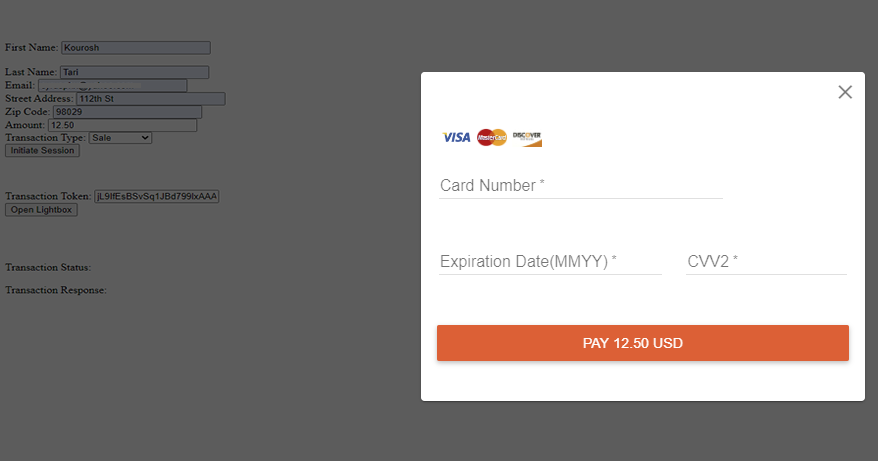
Most HPF solutions use an iframe to embed your checkout form as an overlay to your online store.
When your online store calls the checkout form, your store darkens and becomes a transparent background, and the checkout form appears as a floating element.
In HPF integration, your server must have the following settings:
- Your domain must have a valid SSL certificate.
- All pages that use the payment script must communicate via HTTPS protocol.
- Your server must support TLS 1.2 protocol.
- The Referrer URL of the domain making the HPF call must be whitelisted.
- All pages that include HPF must import one or more libraries (usually Javascript libraries).
In an HPF integration, your code requests a Session Token from the provider, and then you use the acquired session token to open a payment form.
Needless to say that, you need to have access to the API provided by the provider of the HPP or HPF to be able to implement a successful process.
The following code shows an example of an HPF integration that I ‘m working on:
Server Side:
<?php

 // Set variables

$merchantID = "xxxxxx"; //Credentials
$merchantUserID = "api"; //Credentials
$merchantPinCode = "xxxxxxxxxxxxxxxxxxxxxxxxxxxxxxxxxxxx"; //Credentials

 $url = "https://api.demo.test.com/hosted-payments/transaction_token"; // URL to demo session token server
//$url = "https://api.live.com/hosted-payments/transaction_token"; // URL to  production session token server


/*Payment Field Variables*/

// In this section, we set variables to be captured by the PHP file and passed to host in the curl request.
$firstname=$_POST['first_name']; //Post first name
$lastname=$_POST['last_name']; //Post first name
$amount= $_POST['amount']; //Post Tran Amount
//$merchanttxnid = $_POST['merchant_txn_id'];
//$invoicenumber = $_POST['invoice_number'];

//Follow the above pattern to add additional fields to be sent in curl request below.


$ch = curl_init();    // initialize curl handle
curl_setopt($ch, CURLOPT_URL,$url); // set url to post to
curl_setopt($ch,CURLOPT_POST, true); // set POST method
curl_setopt($ch, CURLOPT_RETURNTRANSFER, 1);
curl_setopt($ch,CURLOPT_POSTFIELDS,
"merchant_id=$merchantID".
"&user_id=$merchantUserID".
"&pin=$merchantPinCode".
"&transaction_type=CCSALE".
"&first_name=$firstname".
"&last_name=$lastname".
"&get_token=Y".
"&add_token=Y".
"&amount=$amount"
);


curl_setopt($ch, CURLOPT_SSL_VERIFYPEER, false);
curl_setopt($ch, CURLOPT_SSL_VERIFYHOST, false);
curl_setopt($ch, CURLOPT_RETURNTRANSFER, true);
curl_setopt($ch, CURLOPT_VERBOSE, true);


$result = curl_exec($ch); // run the curl procss
curl_close($ch); // Close cURL

echo $result;  //shows the session token.


 ?>
Client Side:
<html>
<head>
    <meta http-equiv="content-type" content="text/html; charset=UTF-8">
    <title>Lightbox Demo</title>
	<script src="https://ajax.googleapis.com/ajax/libs/jquery/3.4.1/jquery.min.js"></script>
</head>
 <body>
<!--<body background="SIF.png">-->
<script>
function initiateLightbox () {
            var tokenRequest = {
                first_name: document.getElementById('name').value,
                last_name: document.getElementById('lastname').value,
                amount: document.getElementById('amount').value
            };
            $.post("lightboxccsaledevportal.php", tokenRequest, function( data ) {
                document.getElementById('token').value = data;
                transactionToken = data;
            });
            return false;
        }

        function showResult (status, msg) {
            document.getElementById('txn_status').innerHTML = "<b>" + status + "</b>";
            document.getElementById('txn_response').innerHTML = msg;
        }
</script>


<script src="https://demo.test.com/hosted-payments/PayWith.js"></script>
    <script>
    	function openLightbox () {
			var paymentFields = {
					txn_auth_token: document.getElementById("token").value
			};
			var callback = {
				onError: function (error) {
					showResult("error", error);
				},
				onCancelled: function () {
						showResult("cancelled", "");
				},
				onDeclined: function (response) {
					showResult("declined", JSON.stringify(response, null, '\t'));
				},
				onApproval: function (response) {
					showResult("approval", JSON.stringify(response, null, '\t'));
				}
			};
			PayWith.open(paymentFields, callback);
			return false;
    	}

    	function showResult (status, msg) {
    		document.getElementById('txn_status').innerHTML = "<b>" + status + "</b>";
			document.getElementById('txn_response').innerHTML = msg;
    	}
    </script>


  </head>
  <body>


  <form name="getSessionTokenForm">
   <br>
		<br>
		<br>
		<br>
            First Name: <input type="text" id="name" name="first_name" size="25" value="John"> <br><br>
            Last Name: <input type="text" id="lastname" name="last_name" size="25" value="Smith"> <br>
            Transaction Amount: <input type="text" id="amount" name="amount" value="100.00"> <br> <br>
            <button onclick="return initiateLightbox();">Click to Confirm Order</button> <br>
        </form>
        <br>
		<br>
		Transaction Token: <input id="token" type="text" name="token" > <br/>

					<button onclick="return openLightbox();">Proceed to Payment</button> <br>
  		</form>

<br>
<br>
<br>

<br>
  		Transaction Status:<div id="txn_status"></div>
  		<br>
  		Transaction Response:<div id="txn_response"></div>

</body>

</html>